Best CapCut Settings to Export for TikTok – Complete Guide 2026
Best CapCut Settings to Export for TikTok — you spend an hour editing, feel good about the result, upload it, and TikTok just ruins it. Blurry text. Washed out colors. That sharp video now looks like it was filmed through a foggy window. Sound familiar?
I have been through this too many times. Here is the thing — the problem is rarely TikTok alone. Yes, it compresses every video. But the real damage starts before that. It starts with wrong export settings in CapCut. When your file is already weak going in, compression finishes it off.
I use CapCut Pro for most of my editing and after a lot of testing, found the settings that actually survive TikTok’s compression. Best CapCut Settings to Export for TikTok — let me break it all down.
Why Your Export Settings Decide Everything
TikTok does not keep your original file. Every upload gets re-encoded into its own format. Give it a clean high quality file and the compression does less damage. Give it a low bitrate wrong-resolution file and it gets ugly fast.
This is what most people miss when they first learn how to use capcut for tiktok. They nail the edit but forget the export. The edit can be perfect — if the export is wrong, none of it survives on TikTok.
The Exact Settings You Need
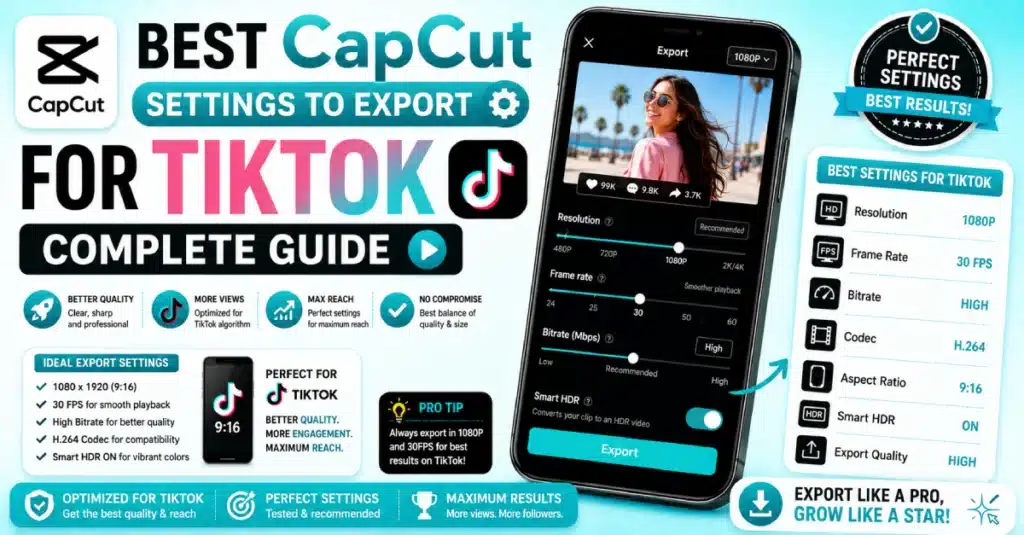
These are the settings I use.These settings perform consistently on various content formats and devices.
Resolution — Always 1080p
Export at 1080 x 1920. That is the vertical 9:16 format TikTok is built around. Some people try 4K thinking it will look better. It does not. TikTok compresses 4K down anyway and your file size just gets massive for no real gain. Stick with 1080p.
Frame Rate — 30fps or 60fps
For talking videos, tutorials, vlogs — 30fps is totally fine. For dances, fast transitions, action content — go 60fps. The movement looks much smoother and transitions land harder. Honestly 30fps covers most content types but if you post high energy stuff, 60fps is worth it.
Bitrate — High or Maximum
This one matters the most. Your videos bitrate is what controls the data used every second.. Low bitrate means less detail. TikTok compresses your file regardless — but if you start with high bitrate, there is more quality to survive that compression. Always push the slider to High or Maximum in CapCut before exporting.
Format — MP4
CapCut exports as MP4 by default and that is exactly what you want. MP4 works cleanly with TikTok. No weird glitches, no compatibility issues. Do not change this unless you have a specific reason.
Codec — H.264
H.265 is good for making files smaller.. Tiktok still handles H.264 better. So H.264 is a bet.
Quick Reference Table
| Setting | What to Use | Why |
| Resolution | 1080 x 1920 (1080p) | TikTok’s native vertical format |
| Frame Rate | 30fps or 60fps | 60fps for fast motion content |
| Bitrate | High or Maximum | More detail survives compression |
| Format | MP4 | Best TikTok compatibility |
| Codec | H.264 | Consistent, clean results |
| Aspect Ratio | 9:16 | Standard TikTok format |
These are the export settings for tiktok that work. Save this table somewhere easy to find.
How to Actually Change These Settings in CapCut
A lot of people know what settings they need but cannot find where to change them. Here is how to do it on mobile.
Finish your edit and tap the export arrow at the top right of the screen. Before you tap the final export button, you will see a small gear or settings icon. Tap that. From there change resolution, frame rate and bitrate. Use the table above to set each one. Then export and wait.
Once done, the video saves to your gallery. If you have been wondering about how to upload a capcut to tiktok after this — open TikTok, tap the plus button, pick your video from the gallery, and post. That is all. No need to re-edit anything inside TikTok. Your settings are locked in.
Want more control over export quality? CapCut Pro APK removes the watermark and unlocks the full maximum bitrate slider. Worth it if you post regularly.
Setting Up Your Project the Right Way Before You Export
Export settings alone will not save a badly set up project. You need to get a few things right from the start when you edit on capcut for tiktok.
First — set your canvas to 9:16 before you do anything else. When you create a new project, CapCut asks for the aspect ratio. Choose 9:16 right away. Fixing it later means awkward cropping and wasted editing time.
Second — import high quality audio. If your background music or voiceover is a low bitrate file, the export picks that up. Always use clean audio sources.
Third — do not stack too many effects. A heavy filter on top of a complex transition on top of color grading all in one clip reduces clarity in the final export. Keep your effects clean and intentional. This directly affects capcut export quality for tiktok.
Many creators who post daily use CapCut app download for android because the mobile version is quick to set up and the export options are right there before you publish.
30fps vs 60fps — Which One Should You Actually Use?
This debate comes up a lot and you will find whole threads about best capcut settings to export for tiktok reddit going back and forth on it. Here is my straightforward answer.
30fps — good for anything calm or dialogue heavy. Vlogs, tutorials, reviews, reaction content. Most phones shoot in 30fps by default so it all lines up nicely.
60fps — better for movement. Dances, transitions, sports content, anything where the frame changes fast.60fps makes movement look natural. 30Fps can look choppy. 60Fps helps.
Different kinds of content on TikTok need export settings. You need to choose the export settings that match your style of content and keep using those settings for all your TikTok videos.
Does Your Device Affect Export Quality?
A little, yes — but not in the way most people think. The settings matter more than the device. What the device affects is speed and comfort.
Exporting 1080p 60fps at maximum bitrate on a budget phone takes a few minutes and heats things up. Normal, but not ideal. If you want faster exports, CapCut for PC handles heavy projects much quicker. Mac users get the same benefit — CapCut for Mac on M-chip devices exports fast and clean. iPhone users will find CapCut for iOS reliable and well optimized for export quality.
For more creator tips, Visit Blog covers a lot of common questions.
Mistakes That Kill Your TikTok Video Quality
I have made most of these myself so let me save you some frustration.
- Exporting at 720p. Some CapCut versions default to 720p. Always check this before exporting. It is the single biggest reason videos look soft on TikTok.
- Leaving bitrate on Normal. This is the second biggest issue. Normal bitrate does not give TikTok enough to work with. Push it to High or Maximum every single time.
- Wrong aspect ratio. 16:9 on TikTok means black bars on both sides. Always use 9:16.
- Using an old version of CapCut. CapCut Old Version sometimes does not have the full bitrate slider. Update the app and those options open up.
- Re-uploading videos that already have a TikTok watermark. It can recognize this and may show your video to a smaller audience. Always use original footage.
Should You Upgrade to CapCut Pro?
The free version covers the basics well. But CapCut Premium removes the watermark and that alone matters a lot for TikTok reach. It also unlocks the full maximum bitrate option with no cap. If you post regularly, CapCut Pro Download is worth it — the sharpness difference shows up especially in videos with fine text or detailed color work.
TikTok compresses everything regardless. But starting with a strong file from CapCut means less damage after compression. Keep your app current via the CapCut Play Store on Android for the latest export features.
For advanced features without a subscription, CapCut MOD APK and CapCut Pro MOD APK are popular — just use a trusted source. For the latest official build, CapCut APK Download has it ready.
Conclusion
So there you go. The best CapCut settings are easy to remember. Use 1080p. Set aspect ratio to 9:16. Choose Maximum bitrate. Select H.264 codec. Pick 30fps or 60fps.
Test it on your next upload and check the difference yourself.To always have the best export tools available, Download CapCut Latest Version and keep the app updated. If you want to make your TikTok videos really good you should get CapCut Pro. This way you can export your videos without any watermarks. Have full control over how they look.
Frequently Asked Questions (FAQs)
What is the best resolution to export from CapCut for TikTok?
If you are uploading to TikTok 1080 times 1920 is the spot. Use the 9:16 format. 4K gets compressed by TikTok.
What frame rate should I use when exporting CapCut videos for TikTok?
I think 30fps is good for videos where you are talking, like vlogs and tutorials.. For dances or videos with a lot of action you should use 60fps. TikTok can handle both so it is up to you. What you are making.
Why does my CapCut video look blurry after uploading to TikTok?
Your bitrate for TikTok may be too low because of the current export settings. TikTok makes videos smaller. To keep the quality good use Maximum bitrate in CapCut. Export your video in 1080p.
Does CapCut add a watermark to TikTok videos?
If I use the version of CapCut I see that my exported videos may include a watermark.. CapCut Pro gets rid of that watermark. I believe this is useful because TikTok may not show watermarked videos much as the ones without watermarks.
What video format should I export from CapCut for TikTok?
Most people prefer MP4 for exporting videos since the codec often gives stable and good quality results.
Can I use CapCut for TikTok exports on PC or Mac?
Yes. CapCut for PC and Mac have the export settings. They are 1080p, 9:16, high bitrate and H.264. Desktop exports are usually faster. They handle projects better than most phones. CapCut is a choice for longer videos.
Give these settings a try on your next post. Best CapCut Settings to Export for TikTok really do make a visible difference — your audience will notice the quality upgrade straight away.