Best CapCut Export Settings 2026 for Perfect Quality
Introduction
Best CapCut Export Settings are very important if you want sharp and clear videos in 2026. Many people edit nicely, but after export, the video becomes blurry or low quality. That feels bad, right? The problem is not editing. The problem is the wrong export settings.
If you really want no quality loss, you must understand the Best CapCut Export Settings for your platform. YouTube, TikTok, Reels, or even client work — each needs slightly different settings. In this guide, I will explain everything in a simple way so you can export like a pro.
Why Export Settings Matter in CapCut?
Your export settings decide the final quality of your video. You may add nice effects, smooth cuts, and perfect color grading. But wrong export settings can make the video soft or unclear. Truly, that is painful after so much editing work.
Best CapCut Export Settings help keep your original quality safe. Resolution controls sharpness. Bitrate controls detail. FPS controls smooth motion. If one of them is wrong, quality drops. So yes, export settings are not a small thing. They are the final step that saves your hard work.
Common Mistakes Beginners Make
Many people who are new to video editing export their videos in 720p to make the file size small. That is not a choice. Some people even export at 60 frames per second while their video was shot at 30 frames per second. This creates a strange motion feel. Others ignore bitrate and keep it on auto.
Well, Best CapCut Export Settings are simple if you match them with your original video settings. Always check your source resolution and FPS before exporting. A small check can save big quality.
Best CapCut Export Settings for YouTube in 2026
For YouTube, quality matters a lot. YouTube compresses videos after upload. So if you upload low quality, it becomes even worse. That is why you must export in high quality.
Here are recommended Best CapCut Export Settings for YouTube:
- Resolution: 1920×1080 (Full HD) or 3840×2160 (4K)
- Frame Rate: Same as source (30fps or 60fps)
- Bitrate: 12–20 Mbps for 1080p, 35–45 Mbps for 4K
- Format: MP4 (H.264)
If you are using a CapCut PC, you get better control over bitrate. The PC version gives more stable export and higher performance. It is good for serious YouTubers.
1080p vs 4K – Which One Should You Choose?
1080p quality is enough for almost every creator. It gives sharp quality and smaller file size. But if you want more clarity and better YouTube compression results, 4K is better.
4K videos get better encoding on YouTube. Even if people watch in 1080p, the quality looks cleaner. But remember, 4K needs a strong device and more storage. So choose wisely.
Best CapCut Export Settings for TikTok & Reels
Short videos are very popular now. TikTok and Instagram Reels need vertical format. If you export in the wrong aspect ratio, black bars will appear.
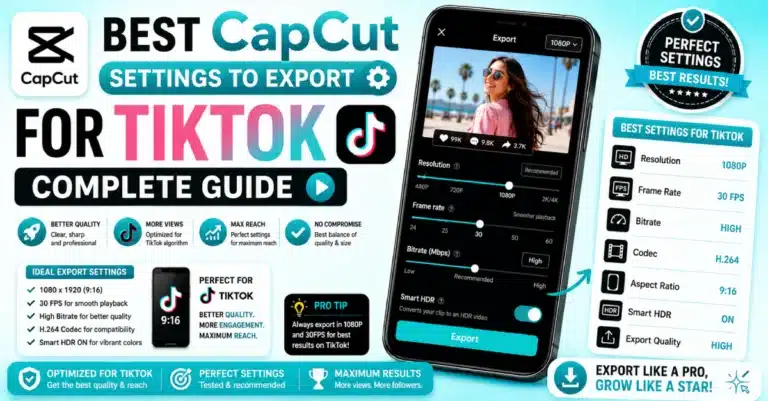
Use these Best CapCut Export Settings for short videos:
- Resolution: 1080×1920
- Aspect Ratio: 9:16
- Frame Rate: 30fps
- Bitrate: 8–12 Mbps
If you use CapCut iOS or Android version, keep settings simple. Do not use too high bitrate because social apps compress anyway.
Avoiding Compression on Social Media
Social media always compresses videos. But you can reduce quality loss by exporting in high bitrate first. Upload using a strong WiFi connection. Avoid sending through WhatsApp before posting.
Small tip. Upload directly from your gallery, not from screen recording. These little things improve final quality.
Best CapCut Export Settings for PC Users
Best CapCut Export Settings on PC are slightly better than mobile. Why? Because the PC supports higher bitrate and smoother rendering. If you are editing professional projects, PC is a better choice.
Use these settings:
- Resolution: 1080p or 4K
- Bitrate: 20–50 Mbps
- Codec: H.264 or H.265
- Enable hardware acceleration
If you want premium features, many creators use CapCut Pro for extra tools and advanced options.
Is CapCut PC Better for Export Quality?
Yes, in many cases. The PC version handles large files better. Export speed is faster. Quality control is also more detailed.
Mobile is good for quick edits. But for YouTube or client work, the PC gives more stable output. You feel the difference, especially in 4K projects.
Best CapCut Export Settings for iOS and Android
Mobile editing is very common now. If you are using CapCut iOS or Android, don’t worry. You can still get excellent quality.
Use:
- Resolution: 1080p
- Frame Rate: Match source
- Bitrate: Keep on highest available
- Format: MP4
If your phone storage is low, you may try CapCut Old Version for lighter performance. But new versions usually give better export optimization.
Differences Between CapCut iOS and Android Export
There is a small difference. iOS devices usually give slightly better color processing. Android performance depends on device model.
But honestly, if settings are correct, both give almost the same result. Best CapCut Export Settings work the same way on both platforms.
Understanding Resolution, Bitrate, and FPS (Simple Guide)
Let me explain in a very easy way.
Resolution means video size. 1080p means 1920×1080 pixels. More pixels mean more sharpness.
Bitrate is the data your video uses every second. Higher bitrate gives more clear details. But too high makes the file very big.
FPS means frames per second. 30fps is normal. 60fps is smoother for gaming or action videos.
All three work together. If the resolution is high but the bitrate is low, video still looks bad. So balance is important.
Perfect Balance Between File Size and Quality
If you are making YouTube content then 1080p at 15 Mbps and 30 frames per second is a good choice. This is because standard YouTube content is usually videos. File size stays reasonable, and quality remains sharp.
If you are using a CapCut Mac or PC, you can fine-tune bitrate manually. Test a small 10-second clip first before exporting full video. That saves time and stress.
Advanced Export Settings for Professional Creators
If you are working for clients or building a serious YouTube channel, basic settings are not always enough. You need more control. That’s where advanced export options help. The Best CapCut Export Settings for professionals focus on codec, color depth, and higher bitrate.
First we should understand codec. CapCut mainly uses H.264. It is safe. H.264 is common everywhere.. In 2026 many creators selected H.265 (HEVC). They select H.265 because it keeps quality high. H.265 also keeps file size small. If your device supports H.265 then it is a move. Older devices may face issues with H.265.
Second, bitrate. For client work, never go too low. You should use at least 20 Mbps for exporting 1080p videos. For 4K videos the speed between 40 and 60 Mbps is a choice. This keeps your 1080p shots and 4K shots sharp in your travel scenes and cinematic scenes. If you use CapCut Pro APK, you may see unlocked premium features that allow better export flexibility.
Color grading also matters. If your video has heavy color correction, export at a higher bitrate. Dark scenes need more data. Otherwise, you will see banding or color noise.
Professional creators don’t just click export. They test. They preview. They compare. Honestly, this small extra effort makes a big difference.
When to Use High Bitrate Settings
High bitrate is useful in specific cases. For example:
- Wedding videos
- Travel vlogs with nature shots
- Gaming content
- Client advertisements
If your video has many fast movements, like sports or gaming, low bitrate will create blur and artifacts. In this case, Best CapCut Export Settings should include higher Mbps.
But don’t always use maximum bitrate. It increases file size too much. For simple talking head videos, a medium bitrate is enough.
Think of bitrate like water in a pipe. Too little water, flow is weak. Too much, it wastes space. Balance is key.
Best CapCut Export Settings for Low-End Devices
Not everyone has a powerful phone or computer. And that’s okay. You can still get good quality with smart choices. Best CapCut Export Settings on low-end devices focus on stability and smooth export.
Use these settings:
- Resolution: 720p or 1080p (if device allows)
- Frame Rate: 30fps
- Bitrate: 8–12 Mbps
- Close background apps before export
If your phone heats up during export, lower the bitrate slightly. Also, avoid exporting while charging if the device gets too hot.
Some users prefer CapCut APK Download versions for older devices. Others try CapCut Mod APK for unlocked features. But always be careful and download from safe sources.
For PC users with low RAM, try exporting in parts. Split your project into small sections, export them, then combine. It sounds like extra work, but it saves crashes.
How to Reduce File Size Without Losing Much Quality
Saving space without harming quality sounds hard to believe. But you can reduce it smartly.
Here’s how:
- Use H.265 codec
- Keep resolution same but slightly lower bitrate
- Avoid unnecessary 60fps
- Remove unused clips from timeline
For example, if your video is a simple talking video, you don’t need 20 Mbps. Even 12–15 Mbps will look great. Best CapCut Export Settings are not about maximum numbers. They are about correct numbers.
Troubleshooting Export Quality Problems
Sometimes you follow all settings, but still face issues. The video looks blurry. Audio goes out of sync. Export gets stuck. It happens. Don’t panic.
A blurry video after posting often means you should check platform compression. Social media reduces quality automatically. Try uploading at a higher bitrate next time.
If audio is out of sync, make sure the FPS of the project matches export FPS. Mismatch causes delay.
If export fails, clear cache and restart the app. If needed, reinstall the app or try CapCut Pro APK Download for updated version.
Best CapCut Export Settings solve most problems. But small technical errors can still happen. Always double-check before final export.
Quick Fix Checklist Before Final Export
Before pressing export button, check this simple list:
- Is the resolution correct?
- Is the FPS the same as the original video?
- Is bitrate high enough?
- Is aspect ratio correct for the platform?
- Did you preview the full video?
This 1-minute check can save hours of regret. Trust me.
Recommended Export Settings Table 2026
Below is a quick guide table for Best CapCut Export Settings in 2026:
| Platform | Resolution | FPS | Bitrate | Format |
| YouTube 1080p | 1920×1080 | 30/60 | 15–20 Mbps | MP4 H.264 |
| YouTube 4K | 3840×2160 | 30/60 | 40–60 Mbps | MP4 H.264/H.265 |
| TikTok | 1080×1920 (9:16) | 30 | 8–12 Mbps | MP4 |
| Instagram Reel | 1080×1920 (9:16) | 30 | 8–10 Mbps | MP4 |
| 1080p | 30 | 10–15 Mbps | MP4 |
Save this table. It will help you every time.
Conclusion
Best CapCut Export Settings are not complicated. You just need to match resolution, FPS, and bitrate with your platform. A small wrong setting can reduce quality. But the correct setting keeps your video sharp and professional.
Quality is really important now. YouTube, TikTok and Reels are more competitive than before. So don’t ignore the export step. Honestly, export settings are the final touch of your hard work.
Now open CapCut and check your settings. Try these Best CapCut Export Settings and see the difference yourself. Practice once or twice, and it will become easy.
FAQs
1. What are the Best CapCut Export Settings for YouTube?
To make your video look good you need to choose the resolution and you have two options: you can choose 1080p. You can choose a 4K resolution.
2. Does higher bitrate always mean better quality?
Not always. A very high bitrate increases file size. Choosing the right bitrate balance protects quality and limits storage waste.
3. Should I export in 60fps or 30fps?
Export in the same FPS as your original video. Set sixty frames per second for videos filled with gaming or action moments.
4. Why does my CapCut video look blurry after upload?
Social media compresses videos. Export at a higher bitrate and upload with strong internet connection.
5. Is 4K export necessary in 2026?
Not necessary for everyone. 1080p is enough. But 4K gives better compression results on YouTube.
6. What is the best format for exporting in CapCut?
MP4 with H.264 codec is safest and widely supported for all platforms.
If this guide helped you, try these settings today and improve your video quality with the right Best CapCut Export Settings.