CapCut Speed Ramp: How to Create Speed Ramp Effects in CapCut 2026
You’ve definitely seen this technique even if you didn’t know the name for it — footage that speeds through the boring part, then eases into slow motion right as something interesting happens, then snaps back to normal. That’s CapCut Speed Ramp. Instead of a clip running at one flat speed, it shifts fluidly between slow and fast at exactly the moments you want emphasized. Works great for gaming, sports, cars, dance, travel — basically anything with movement worth drawing attention to.
CapCut handles this with either preset speed curves or a fully custom one you build yourself, and neither requires much editing experience. A little time spent adjusting a curve can turn otherwise flat footage into something that actually feels intentional and energetic.
CapCut Pro APK might get you a couple extra tools depending on version, though the core mechanics here don’t change either way.

So What’s a Speed Ramp, Exactly?
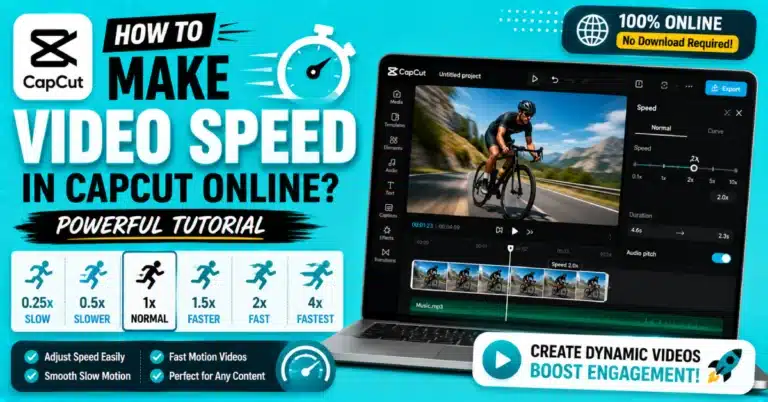
It’s a gradual shift between different playback speeds within a single clip — start normal, ramp up fast, slow way down for the important beat, then speed back up again. That’s fundamentally different from just applying a flat 2x to the whole clip. A regular speed adjustment changes the whole thing uniformly. A ramp changes speed at specific points along the timeline.
| Speed Pattern | Typical Use |
| Slow to fast | Building energy |
| Fast to slow | Highlighting a key action |
| Slow to fast to slow | Cinematic movement |
| Normal to fast | Quick transition |
| Fast to normal | Smooth scene change |
That flexibility is really the whole appeal — you’re not stuck with a single mood for the entire clip.
Why Bother Ramping Speed At All?
It’s a direct way to steer where the viewer’s attention lands. Picture a sports clip: a player sprinting toward the goal. Speed through the run-up, drop into slow motion right as the kick happens, then snap back to normal once it’s landed. Suddenly the moment has weight it wouldn’t have had at a flat playback speed.
It also pairs really well with music — timing speed shifts to actual beats or drops makes the whole edit feel tied to the soundtrack instead of just sitting next to it.
Building a Basic Speed Ramp
Start a project, get your footage in, and select the clip on your timeline. Open the Speed menu and look for Curve or whatever speed ramp controls your version offers — there are usually a few preset curves built for different styles.
Try one, preview it against your footage. If none of the presets quite fit, switch to the custom curve option if it’s available — that’s where you get real control over exactly where things speed up or slow down.
Understanding Speed Curves
This is really the core tool here. Rather than one flat speed for the whole clip, a curve is a series of points that each control playback speed at that moment — push one point up for faster, pull another down for slower.
Exact interface details shift a bit between versions, but the underlying logic stays the same: higher on the curve means faster, lower means slower. Move the points until the timing actually lines up with what’s happening in the footage, and always preview the full section after adjusting — a change that looks right on paper doesn’t always feel right in motion.
Slow to Fast
Here’s the thing — a speed ramp can change the whole feeling of a video. Begin slowly, let the pace increase as the moment develops, then end with normal or faster playback. It’s a great fit for travel shots, runners, car footage, dance clips, camera moves, and cinematic reveals.
The key is making the ramp feel gradual — jump too fast between speeds and the whole thing starts looking glitchy rather than intentional.
Fast to Slow
Flip it around when you want to spotlight a specific moment. Start faster, then gradually pull the speed down as you approach the key beat, hold it slow through that moment, then return to normal if needed.
Great for sports, gaming, action, and dance content — speed through the setup of a basketball shot, for instance, and slow right down as the ball hits the rim.
Slow to Fast to Slow
Probably the most popular version of this technique. The clip opens slow, ramps up through the middle, then eases back down around the main action. It creates a rhythm that reads as genuinely cinematic rather than just “sped up video.”
Sports highlights, car edits, dance content, travel clips, fashion videos, music edits — all solid fits. The trick is making sure there’s actually a clear, worthwhile action happening during that final slow section; otherwise the buildup doesn’t pay off.
On Android
Import your footage, select the clip, open Speed, choose Curve, and pick a preset or build a custom curve if that’s available to you. Preview it.
Our CapCut Android guide covers more general mobile editing. One tip worth knowing: pick footage with genuine, clear movement in it — a speed ramp on something mostly static doesn’t really read as anything.
On iPhone
Same rough flow — new project, import, select the clip, open the speed controls, pick Curve, choose or customize a preset. Preview and nudge the speed points until the motion feels smooth rather than jerky.
Our CapCut iOS guide has more on iPhone/iPad specifics. If slowed-down sections look choppy, check your original footage’s frame rate before assuming the curve itself is the problem.
On PC
That’s the useful part — the desktop lets you see more while adjusting. Import your footage, add it to the timeline, select the clip, and work with the speed curve options. Use an existing preset or make your own, then review the full section.
Our CapCut PC guide covers more desktop tools. On longer projects, it’s worth keeping your speed choices consistent with the overall tone of the video rather than mixing wildly different styles clip to clip.
On Mac
Same basic process — import, select, open speed controls, choose Curve, apply or customize, preview before moving on.
Our CapCut Mac guide has more macOS-specific notes. The bigger screen genuinely helps here — it’s easier to see how the curve you’re drawing actually maps onto the action happening in the footage below it.
Syncing a Ramp to Music
This is where speed ramping really clicks into place. Add your track first, actually listen for strong beats, drops, or shifts in rhythm, and place your speed changes around those specific moments — ramping up right before a drop, then slowing hard the instant it hits, for example.
Our guide on adding music to CapCut covers getting a track into your project. Don’t force every single ramp to land exactly on a beat, though — sometimes slowing down just ahead of a musical moment, rather than exactly on it, actually hits harder.
Speed Ramping for Sports Footage
Sports content is basically built for this technique — there’s almost always a clear setup and a clear payoff moment. Speed through the buildup, slow down for the actual play: a kick, a shot, a serve, a trick landing.
Fast → slow → fast is the classic shape here. Just make sure the slow section actually lands on the moment people care about — slowing down a random, uneventful stretch just confuses the pacing instead of adding drama.
Speed Ramping for Gaming Content
Works the same way — speed through exploration or setup, slow down for the moment that actually matters. A creator might blitz through several seconds of gameplay before easing into slow motion for a clutch final shot.
Layering in a flash effect or text animation right at that slowdown can make it hit even harder. Our flash effect guide covers building that kind of bright transition, which pairs naturally with speed ramps.
Getting Ramps to Feel Smooth
The single most important thing in CapCut is gradual movement between speeds. Jumping instantly from very slow to very fast tends to look jarring rather than intentional — build a curve with real transition time between points instead.
Original frame rate matters more than people expect too. Footage shot at a higher frame rate just gives you more room to work with when building slow-motion sections. If you’re shooting at 60 FPS, our CapCut 60 FPS guide covers how that affects smoothness and export settings specifically.
Pairing Speed Ramps With Motion Blur
Yes, and it genuinely helps. Fast speed changes can make individual frames look a little sharp or unnatural in isolation — a reasonable amount of motion blur smooths that out and gives the whole thing a more cinematic feel.
Our motion blur guide walks through applying this to fast-moving footage specifically. Just don’t overdo it — too much blur starts eating detail and makes the video genuinely harder to watch.
Pairing Speed Ramps With Keyframes
These are two different tools working on different properties — speed curves control playback speed, keyframes control things like position, scale, rotation, and opacity. Nothing stops you from using both at once: speeding up a clip while simultaneously zooming toward the subject, for instance, adds a real sense of dynamic movement.
Our smooth keyframes guide covers building controlled motion this way. This combination tends to shine especially in cinematic edits and music videos, where a single flat speed change can start to feel a little one-note on its own.
Where People Go Wrong?
Overuse is the big one — apply a dramatic speed ramp to every single clip and none of them stand out anymore. Beyond that: pushing speed changes too extreme, ignoring your original frame rate, creating abrupt jumps instead of smooth curves, slowing down moments that don’t actually matter, ignoring how the music’s timed, and stacking on too many extra effects at once.
That’s the frustrating part — it’s easy to overdo speed changes. A speed ramp should work with the footage. If viewers notice the editing trick more than the actual scene, it needs adjustment.
Getting Better Overall Results
Start with good source footage. A speed ramp can’t fix weak material. If anything, it may make the problems easier to notice. Use a suitable frame rate when possible, choose clear actions for slow-motion sections, and keep the curve smooth. Watch the entire clip several times before you’re done.
Color adjustments and complementary effects can round things out further. Our guide on improving video quality in CapCut covers more of that ground.) Worth remembering: speed ramping is a creative technique, not a fix for footage that’s already got real quality problems.
Do You Need CapCut Pro for This?
Not necessarily. Whether you get access to speed curves depends more on your version, device, and account than on a subscription tier specifically. If your build includes curve controls, you’re set to build different speed patterns regardless of premium status — good speed ramping really comes down to timing and source footage more than which tier you’re on.
Does CapCut APK Support This?
Supported builds generally include speed curves and the other tools needed for ramping, though exact features shift between versions and devices. If a curve option from a tutorial isn’t showing up for you, check whether your version just uses different naming or a different menu layout before assuming it’s missing entirely. Worth skipping unverified modified builds just to chase one feature — not a great trade against your device’s security.
Wrapping Up
Speed ramping is a genuinely powerful way to control pacing and spotlight the moments that matter — combine slow and fast sections well and you get real cinematic rhythm, whether you’re editing sports, gaming, travel, dance, cars, or music content.
Start simple with the built-in presets before building custom curves. Keep transitions smooth, sync important beats with music where it makes sense, and lean on higher-frame-rate footage whenever you’re planning serious slow-motion work. Android, iPhone, PC, Mac — the technique translates across all of them, and it’s a genuinely easy way to make an edit feel more deliberate and professional.
Frequently Asked Questions
What is a CapCut Speed Ramp?
Here’s the thing — this technique isn’t just about making a clip faster or slower. It lets you adjust speed at different points, creating smooth transitions from slow to fast, fast to slow, or several shifts together.
How do I build one?
Here’s what matters — the first curve you make might not be perfect. Select the clip, open Speed, choose Curve, adjust the points, and preview the section until the speed changes feel smooth.
Does this work on mobile?
Yes — both Android and iPhone support curve-based speed editing when the feature’s available in your version, though the interface can look a bit different by build.
Is 60 FPS actually better for this?
Generally yes for slow-motion sections specifically, since there’s more frame data to work with — though overall quality still depends on your original footage, lighting, and how aggressive the speed change is.
Can I sync a ramp to music?
Yes — add your track, find the strong beats or rhythm shifts, and time your speed changes around those points for a more connected, energetic feel.
Does motion blur help?
Yes, it smooths out fast sections and adds a more cinematic look — just apply it carefully, since too much can bury detail you actually want visible.
Do I need CapCut Pro?
Not necessarily — basic curve tools are often available without premium access, though specific presets and features can vary by version and platform.
Why does my ramp look choppy?
Usually one of: low original frame rate pushed too hard, overly extreme speed jumps, or too many demanding effects stacked at once. Higher-frame-rate source footage generally gives you more room to work with.
Worth experimenting with a few different curve shapes and music timings to find what actually fits your style — there’s plenty more to dig into once the basics click.