Create a VHS Effect in CapCut for a Retro Look
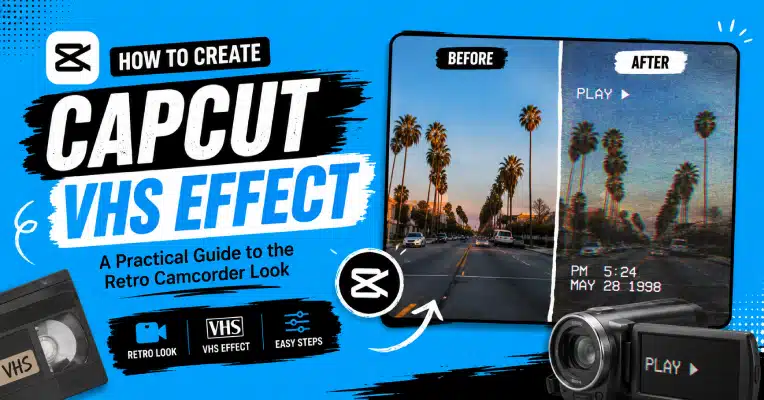
Why do old camcorder footage and the CapCut VHS Effect feel so nostalgic? It is the details that make them special. The grain, the colors, the scan lines and the random glitches all play a part. The CapCut VHS Effect brings those details into your videos and adds a timestamp in the corner. The result is that your phone footage can look like it came from an old tape.
This effect is useful for a lot of things. You can use it for music videos, gaming clips, travel footage, throwback edits and birthday memories. It also works well for TikTok and Instagram posts.. You do not need to use separate editing software. CapCut already has the filters, effects, overlays and text tools that you need.
If you’re running CapCut Pro APK, you might have a few extra filters, templates, and tools depending on your version and account. But the core VHS look doesn’t actually require any of that — it comes down to combining a handful of basic techniques well.
What Actually Made VHS Look Like VHS?
Remember VHS? Video Home System was the go to format for recording and playing videos at home before digital video became widespread. Its image had a very different look compared with what today’s phone cameras capture.
Remember those little VHS flaws? Visible grain. Horizontal scan lines. Muted colors. A soft or blurry image. You might also get distortion, background noise, tracking glitches, an occasional visual hiccup, an onscreen timestamp, and a slight red, blue, or green color cast.
You don’t need all of that in one video. Picking a few of these and applying them with a light hand usually gets you a more convincing — and more watchable — result than piling everything on at once.
Building the Basic Effect
Do you have your footage ready? If you do, you should put it into a CapCut project. Then tap on the clip you just added. Now you need to check the filters and the effects panels to see if you can find retro, vintage, VHS, glitch or noise options. Sometimes these options might have different names and that is because they can look different in different versions of CapCut Pro.
Apply whichever one fits and dial in the intensity. Resist the urge to max it out right away — pushed too far, these effects start looking fake and start eating detail you actually want to keep.
Once the main effect is set, add a few extra details. Try grain, scan lines, light distortion, or even a timestamp. The best VHS edits usually come from several subtle touches working together, not one filter pushed too far.
Getting the Filter Right
If you want to do this fast you should use a filter. You bring the clip into your project then you select it on the timeline. After that you check out the vintage filter categories. You are looking for something that makes the colors softer. The footage look older.
If your version lets you adjust intensity, do it — a strong setting can work great for a quick transition moment, but it’s usually too much for an entire video. From there, you can fine-tune manually with brightness, contrast, and saturation to get more control over exactly how it looks.
Working in Glitches
Glitches aren’t just decoration in a VHS edit. They help sell the idea of an old tape having tracking problems or suddenly hitting a playback hiccup.
Here’s where timing matters. Browse the effects menu for glitch, distortion, RGB split, or shake effects. Add them only at selected points. A glitch just before a cut or right on a beat can look much better than continuous shaking.
If your footage involves fast motion, it’s also worth checking our guide on adding motion blur in CapCut — it pairs well with retro effects.
Adding Grain
Grain is what roughens up otherwise clean smartphone footage. Modern cameras shoot sharp; VHS tapes did not.
Look for grain, noise, or film-texture effects, apply a light amount, and preview before committing — too much and you’ll start losing faces and text under the noise. The goal is grain that’s visible without taking over. Pairing it with a slight sharpness reduction helps sell the “not shot yesterday” feeling too.
Getting Scan Lines In
Those thin horizontal lines running across the frame are one of the most recognizable VHS signatures. If your version has a scan line effect built in, apply it and tune the intensity — or use an overlay if one’s available in your project resources.
Keep it light. Heavy scan lines make text hard to read and blur out facial detail. They tend to work best paired with a bit of noise and light distortion rather than standing alone.
The Timestamp
Nothing sells “old camcorder footage” quite like a date-and-time overlay burned into the corner of the frame. You can build this with CapCut’s text tool — pick a simple font that resembles those old digital displays, keep it small, and tuck it near a corner.
Something like:
08 09 26
or
AUG 09 2026 03:45 PM
works fine. Just don’t let it become more eye-catching than the footage itself. This little detail does a lot for birthday videos, childhood memory edits, and travel footage in particular.
Dialing In the Color
Color plays a big role in the overall story. Modern video often uses strong contrast with bright, accurate colors. VHS footage was softer and much less precise.
Once the main effect is added, begin changing the color settings. Try levels of saturation contrast, brightness, temperature, fade, highlights and shadows. Dropping saturation a touch is usually the first move if things still look too “modern.” A slight overall color shift helps too — just be careful not to push skin tones into obviously red or green territory. You want it to look old, not broken.
Softening the Image
VHS footage was inherently softer than what modern cameras capture. If your source is razor sharp, a light blur helps sell the illusion — just don’t overdo it. You still want enough detail that viewers can actually follow what’s happening.
Pairing a subtle blur with grain and light distortion tends to land better than blur on its own. And if your original footage is already soft or low quality, adding more blur usually isn’t the fix — our guide on improving video quality in CapCut covers that situation instead.
Doing This on Android
The mobile app handles this just as well as desktop. Start a project, import your clip, select it, and browse filters/effects for retro or VHS options. Apply the main effect, adjust intensity, then layer in grain, glitch, distortion, or scan lines as available.
Our CapCut for Android guide has more general editing tips if you need them.
One thing worth doing: preview the finished video a few times before exporting. VHS effects can read very differently on a small phone screen versus the editing timeline.
Doing This on iPhone
Same basic flow. Import the footage, select it on the timeline, open the filters/effects panel, and find something retro. Adjust the intensity, layer in extras, and build your timestamp with the text tool same as before.
Check our CapCut for iOS guide for more on iPhone and iPad editing. For nostalgic edits specifically, pairing the VHS look with old photos, simple transitions, and period-appropriate music tends to elevate the whole thing.
Doing This on PC
Desktop gives you more room to manage layers and multiple effects at once. Import your footage, apply the main VHS style, then build up grain, distortion, scan lines, and text as needed.
Our CapCut for PC guide covers more desktop-specific techniques. The bigger preview window makes it a lot easier to catch whether an effect is covering up something important — worth making several versions and comparing before you lock in a final look.
Doing This on Mac
Same process as PC — import, apply your retro base effect, then customize color, grain, distortion, and text from there. See our CapCut for Mac guide for more.
If you’re working on something longer, it’s usually better to keep the VHS treatment consistent scene to scene rather than reinventing the settings each time — consistency is what makes the final edit feel like one continuous recording instead of a patchwork of different filters.
Syncing the Effect to Music
Music turns a decent VHS edit into a genuinely good one. Try timing glitches, text movement, or quick distortion hits to land on beats — a short glitch right as the beat drops, or a timestamp that fades in when a new section starts.
Our guide on adding music to CapCut covers the copyright side of things, which is worth reading before you pick a track. Just don’t hit every single beat with an effect — leaving some moments clean makes the ones you do hit land harder.
Building a VHS-Style Intro
A short intro can set the tone fast. Open on a dark or slightly faded frame, drop in a timestamp or basic title, then let a small glitch or distortion moment lead into the main footage. Animated text in a retro font works well here too — our CapCut text animation guide walks through building those.
Keep it brief. A few seconds is usually all it takes to establish the visual style before people start wanting the actual content.
Different Aspect Ratios
VHS effects generally hold up fine across aspect ratios, but it’s worth double-checking after switching formats — an overlay built for horizontal video can behave differently once dropped into a vertical 9:16 frame for TikTok, Reels, or Shorts.
Our guide on changing aspect ratio in CapCut walks through resizing without cropping out anything important. Always give the whole video a full preview after switching formats, not just a quick glance.
Mistakes Worth Avoiding
The most common one is just piling on too much at once — heavy grain, aggressive distortion, strong blur, exaggerated color shifts, and nonstop glitching add up fast into something genuinely hard to watch.
A timestamp that’s too big is another frequent one. And it’s easy to slap on a strong VHS filter without actually checking what it’s doing to skin tones or fine detail.
The effect should support the footage, not bury it. A well-done retro edit looks intentionally old — not like the file got corrupted.
Before You Export
Watch the whole thing through once more before exporting. Check the grain level, glitch timing, whether text is still readable, the color balance, audio levels, aspect ratio, and resolution.
Pick export settings that suit your original footage and wherever it’s going. And don’t assume bumping the export resolution higher will make the effect look better — the retro quality comes from your editing choices, not from an unnecessarily large output file.
Do You Need CapCut Pro for This?
Not really. Most of the core look — filters, effects, adjustments, text, overlays — is available in the free tools. Depending on your plan, CapCut Premium might add a few extra effects or templates, but the real skill is in how well you combine what’s already there. A simple effect applied with good timing will beat a premium one used carelessly, every time.
What About CapCut APK Versions?
Supported CapCut APK builds usually include the filters, effects, and text tools needed for this type of edit. Menu names can change by version, device, or region. Can’t find something from a tutorial? It may simply have a different name or sit under another menu.
One caution: don’t go downloading modified files from random sources just to chase one specific filter. Keeping your device and project safe matters a lot more than any single effect.
Wrapping Up
Clean phone footage can look completely different with the CapCut VHS Effect. Add a retro filter first. Then try grain, scan lines, a touch of blur, some color adjustment, occasional glitches, and a timestamp. The result can get surprisingly close to that familiar old camcorder style.
You really don’t need every trick in the list. Start with a subtle filter, add details gradually, and stop once it looks convincingly retro without becoming a chore to watch.
Want to use this effect on different platforms? CapCut has enough built in tools for Android, iPhone, PC, and Mac. Create versions for TikTok, Reels, Shorts, YouTube, music edits, or memory videos. Then have some fun with the settings. Change the grain, distortion, color, and timing until the effect feels like something you created yourself.
Frequently Asked Questions
What is the CapCut VHS Effect? It is pretty simple. You start with the grain and the faded color. Then you add the lines the blur, the glitches, the distortion and the timestamp overlay. When you put all these things together they can make new footage look like videotape.
How do I actually create it? Import your footage, apply a retro or VHS-style filter, and adjust the intensity. From there, layer in grain, glitches, scan lines, color tweaks, and a timestamp for a stronger effect.
Can I do this on my phone? Yes — CapCut’s mobile app works fine for this on both Android and iPhone. Import your clip, apply the relevant effects, adjust colors, and add retro touches as needed.
Do I need CapCut Pro? No. The core look is achievable with free tools — filters, effects, adjustments, text, and overlays. Premium plans just add some extra effects and templates on top.
How do I make it look realistic instead of fake? Lean on several subtle effects rather than one extreme filter — light grain, faded color, small distortions, a bit of blur, and a simple timestamp. Restraint is what sells it.
Can I add a timestamp? Yes. The text tool can do the job. Use a digital-style font and place it neatly in a corner. That’s usually enough to create that old camcorder feel.
Does this work for TikTok and Reels? It can fit all kinds of projects. Think nostalgic edits, music clips, fashion content, memory videos, and gaming footage. The main thing is getting the aspect ratio right while keeping your subject clearly visible.
Try a few of these on your own footage and see what sticks — there’s plenty more to explore once you’ve got the basics down.